

Guide info: Odin v3.14.4 · Windows 11 (25H2/26H2) · One UI 7–8.5 (Android 15–16); One UI 9 (Android 17) shipped July 2026 on the Galaxy Z Fold8
⚠️ Before you start: Flashing the wrong firmware can prevent your device from booting. Always verify your exact model number and CSC before proceeding — see Step 3 below.
Table of contents
- Quick answer
- What is Odin, and why flash Samsung firmware with Odin?
- When should you flash firmware?
- What you need to flash Samsung firmware with Odin
- Estimated flash time
- Back up first: what CSC and HOME_CSC do to your data
- Step 1: Enter Download mode
- Step 2: Install the Samsung USB driver
- Step 3: Download the correct firmware
- Step 4: Extract the firmware files
- Step 5: Open Odin
- Step 6: Load each file into the right slot
- Step 7: Start flashing
- Understanding PASS vs FAIL
- When you cannot flash Samsung firmware with Odin: device not detected
- Recovering from a failed flash
- PIT files and the Re-Partition option
- What to do after the flash completes
- Knox, FRP and your warranty
- Common mistakes
- Frequently asked questions
Quick answer
To flash Samsung firmware with Odin: download the firmware that matches your exact model and region, extract it into the BL, AP, CP and CSC (or HOME_CSC) files, boot your phone into Download mode, load each file into its matching slot in Odin, and press Start. The flash itself typically takes 5–10 minutes and the phone reboots on its own when Auto Reboot is enabled. Common causes of failure include the wrong model or CSC, a faulty USB cable, and a low battery — all of which this guide covers.
What you’ll learn
- How to flash Samsung firmware with Odin safely, from preparation to first boot
- How to use Odin without bricking your device
- Whether to choose CSC or HOME_CSC for your situation
- How to read Odin’s PASS/FAIL result and work through the errors it reports
- What to do when Odin does not detect your phone at all
- How to recover if a flash fails part way through
What is Odin, and why flash Samsung firmware with Odin?
Odin is the low-level flashing tool used to write firmware to Galaxy devices over USB. It is not distributed through the Play Store or Samsung’s consumer website — it originated as an internal service tool and has since become the standard utility the Galaxy repair and enthusiast community relies on.
Is it official? The tool came from inside Samsung, but Samsung does not publicly support end users running it. You are using an internal engineering tool rather than a consumer app, which is precisely why every detail below matters. For anything covered by warranty, Samsung’s own support channels remain the correct route.
When you should use it:
- Your phone is stuck in a boot loop or won’t get past the boot logo
- An over-the-air update failed part way through
- You need to change your device’s CSC (its region or carrier firmware variant)
- You rooted the device and want to return it to fully stock software
- A software problem persists after a normal factory reset
When you should not use it:
- The phone works normally and still receives regular software updates — there is no reason to flash manually
- You are not completely certain of your exact model number; firmware built for a different variant can leave the device unbootable
- You want to move to an older build than the one installed — see the rollback warning below
When should you flash firmware?
| Situation | Should you use Odin? |
|---|---|
| Boot loop or stuck on the logo | ✅ Yes |
| Failed software update | ✅ Yes |
| Downgrading firmware | ⚠️ Depends — see the warning below |
| Changing CSC or region | ✅ Yes |
| Removing root, returning to stock | ✅ Yes |
| Brand-new phone working normally | ❌ No |
Downgrade warning: Samsung devices use anti-rollback protection, which can prevent firmware older than a certain revision from installing once the device has moved past it. A rejected or partially written bootloader is one of the ways a device becomes unrecoverable, so treat downgrading as the highest-risk operation in this guide. If you are not certain the older build is permitted for your device, do not attempt it. See the bootloader version guide for how this restriction works, and how to fix SW REV CHECK FAIL if you have already hit it.
What you need to flash Samsung firmware with Odin
- A Windows PC — Odin has no official macOS or Linux build
- The Samsung USB driver installed (see Step 2)
- The exact firmware for your model and CSC (see Step 3)
- A current version of Odin, from an established, trusted source
- A good USB cable — ideally the one that shipped with the phone
- A USB port on the back of a desktop rather than a hub or front-panel socket
- At least 50% battery, preferably more
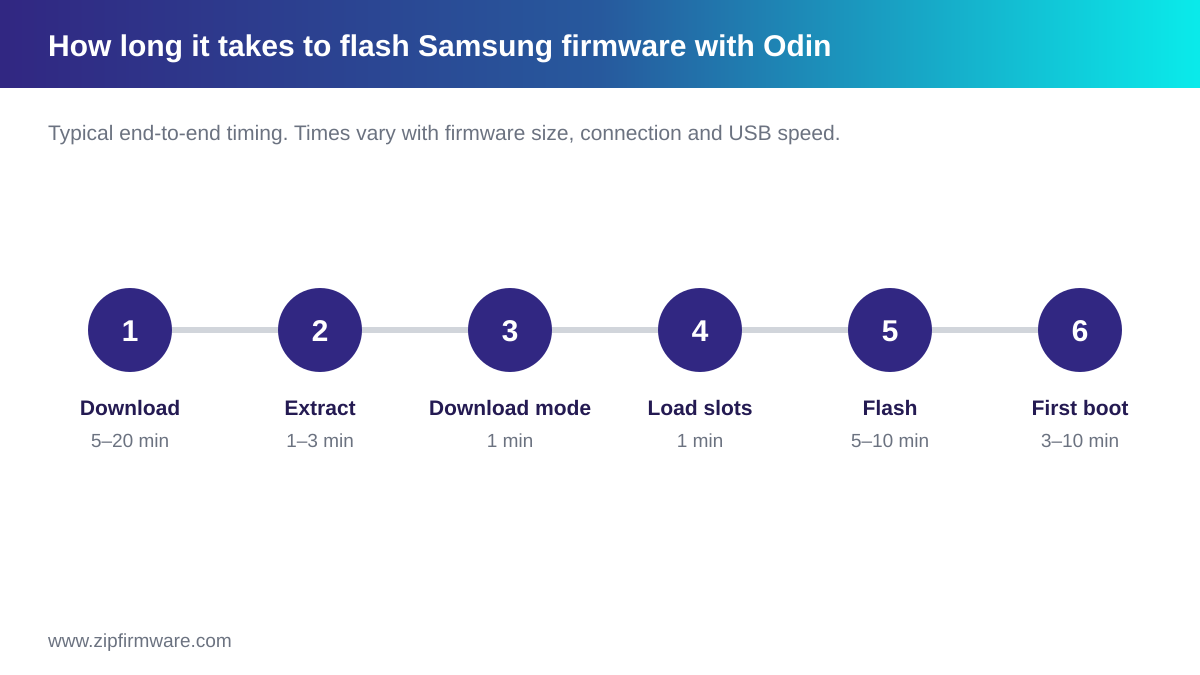
Estimated flash time
End to end, a full flash rarely takes more than half an hour. These figures are typical rather than guaranteed — firmware size, connection speed and USB throughput all shift them:
| Step | Typical time |
|---|---|
| Download firmware | 5–20 min |
| Extract files | 1–3 min |
| Load into Odin | 1 min |
| Flash firmware | 5–10 min |
| First boot | 3–10 min |
Verified compatible devices
The steps in this guide — Download mode, the BL/AP/CP/CSC loading order, and the CSC behaviour described below — apply across current Galaxy generations, including:
- Galaxy S25 Ultra
- Galaxy S24 Ultra
- Galaxy A56
- Galaxy Z Fold6
The firmware file names and slot layout are consistent across current Galaxy models; only the firmware package itself changes per device. If your model is not listed, the same steps still apply — just confirm your specific model number in Step 3.
Back up first: what CSC and HOME_CSC do to your data
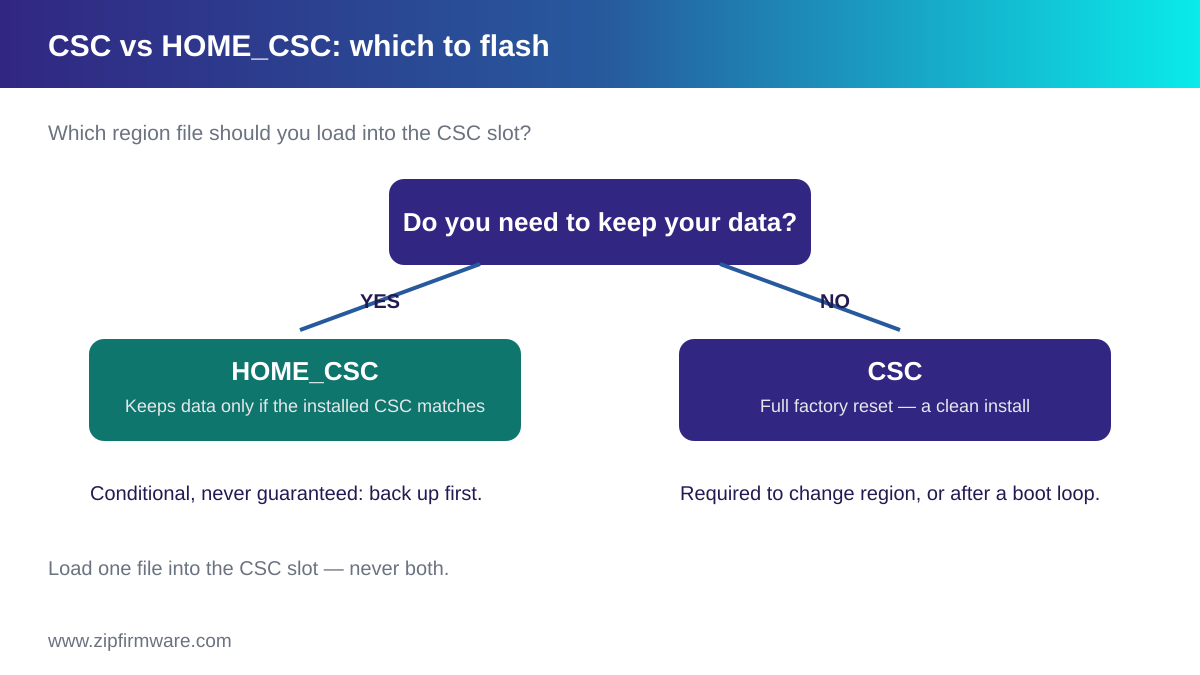
This is the single most important thing to understand before you begin, and it is widely misunderstood:
- Flashing with a CSC file is the option that performs a factory reset. Photos, apps, messages and settings on the device are erased.
- HOME_CSC is intended to skip that reset and keep your data — but only when the CSC already on the device matches the one you are flashing, and the firmware is not older than what is installed. Flashing a different region’s HOME_CSC can still result in a full wipe.
Because that condition is not something most people can confirm with certainty in advance, treat HOME_CSC as a convenience that may preserve your data rather than a guarantee that it will.
Back up anything you care about before you flash, whichever file you choose. Use Samsung Cloud, Smart Switch, or a manual copy to a PC.
Step 1: Enter Download mode
Download mode is the state Odin communicates with, and you cannot flash Samsung firmware with Odin until the phone is in it. The button combination varies by generation, so use the one that matches your device:
- Power the device off completely.
- Recent models without a physical Home button: hold Volume Up + Volume Down together, then connect the USB cable to your PC while still holding both.
- Older models with a physical Home button: hold Volume Down + Home + Power.
- When the warning screen appears, press Volume Up to confirm and enter Download mode.
- Connect the phone to your PC if it is not already connected.
If neither combination works, check your specific model’s documentation rather than guessing — holding the wrong combination generally does nothing, but you cannot proceed until the device is genuinely in Download mode.
Step 2: Install the Samsung USB driver
You cannot flash Samsung firmware with Odin until Windows can see the phone, and that depends on Samsung’s USB driver. On current Windows versions this driver is included with Samsung Smart Switch; installing Smart Switch is a dependable way to get it. Avoid third-party “Samsung driver” download sites, which are a known route for bundled malware.
Restart your PC after installing if prompted. Without the driver, Odin will not detect your device, which is a frequent reason the ID:COM box stays empty.
Step 3: Download the correct firmware
Getting this wrong is the main way people come unstuck. Firmware to flash Samsung firmware with Odin is published per exact combination of four values:
- Model number — for example
SM-A705FN, not simply “A70” - CSC — the region or carrier code such as
XSG,BTUorINS; see Samsung CSC codes explained - Region — the country or carrier that CSC represents
- Build number — the specific firmware version string
You can read these from the device’s software information screen (the exact menu wording varies by One UI version), or from the box or IMEI if the phone will not boot. If you are unsure what is currently installed, see how to check your Samsung Galaxy’s firmware version.
Flashing firmware built for the wrong model number is the leading cause of an unrecoverable device, so verify this before downloading anything.
Step 4: Extract the firmware files
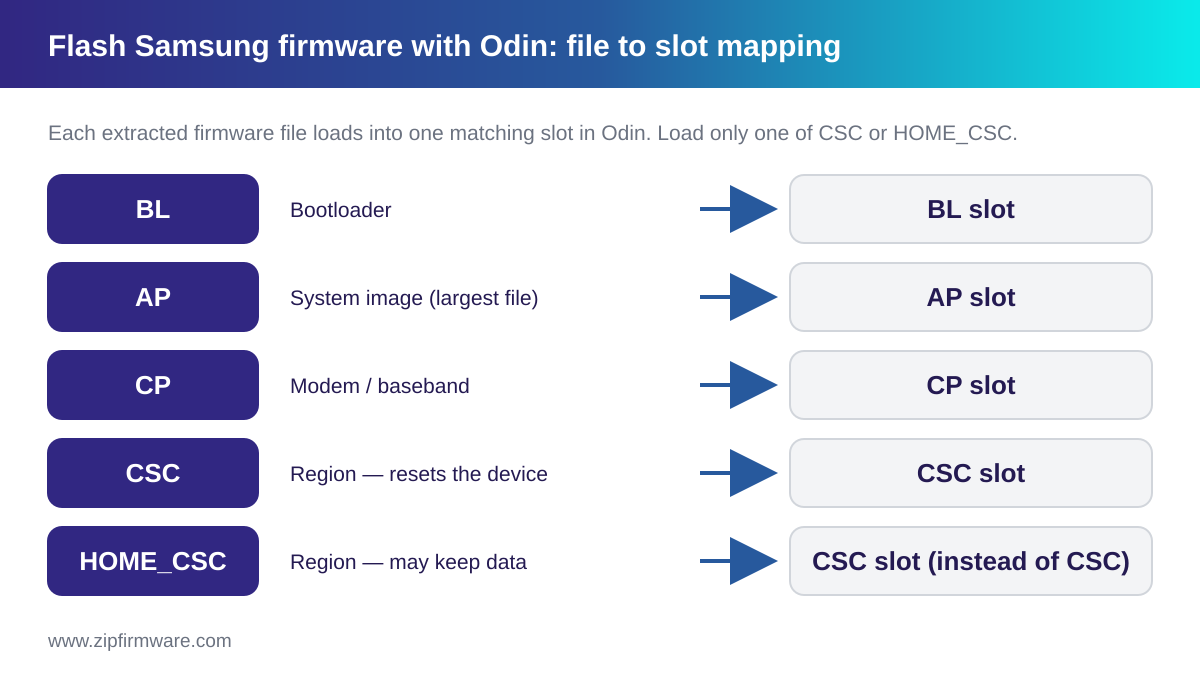
Firmware is distributed as a .zip. Inside are several .tar.md5 files:
| File | What it contains |
|---|---|
| BL (Bootloader) | Low-level boot code that starts the device |
| AP (Application Processor) | The main Android system image — by far the largest file |
| CP (Communication Processor) | Modem and baseband firmware: calls, data, signal |
| CSC | Region customisation — the option that performs a reset |
| HOME_CSC | Region customisation — intended to preserve user data |
Extract the .zip with any standard archive tool such as 7-Zip or WinRAR. Do not extract the .tar.md5 files any further — Odin loads them exactly as they are. For a deeper breakdown of what each file does, see Samsung firmware files explained: AP, BL, CP and CSC.
Step 5: Open Odin
Right-click Odin and choose Run as administrator. A few areas matter:
- ID:COM — becomes highlighted and shows a port number when the phone is detected in Download mode
- Options tab — leave the defaults: Auto Reboot and F. Reset Time enabled, Re-Partition disabled
- BL / AP / CP / CSC buttons — where each corresponding file is loaded
- Log pane — live progress and the final PASS or FAIL result
If the ID:COM box stays empty, work through the detection troubleshooting section below before going any further.
Step 6: Load each file into the right slot
Click each button and select its matching file:
- BL → the file beginning with
BL_ - AP → the file beginning with
AP_ - CP → the file beginning with
CP_ - CSC or HOME_CSC → your choice from the comparison above. Load only one, never both.
Each file goes in its own slot. Loading a file into the wrong slot, or leaving a required file out, is a common route to a failed flash. Confirm the checkboxes next to the loaded files are ticked and leave every other option at its default.
Step 7: Start flashing
This is the step that actually writes the build. Click Start. Do not disconnect the USB cable, touch the phone, or close Odin while it runs. A progress bar appears on the phone, and with Auto Reboot enabled the device restarts automatically when the write completes. A green PASS result confirms success.
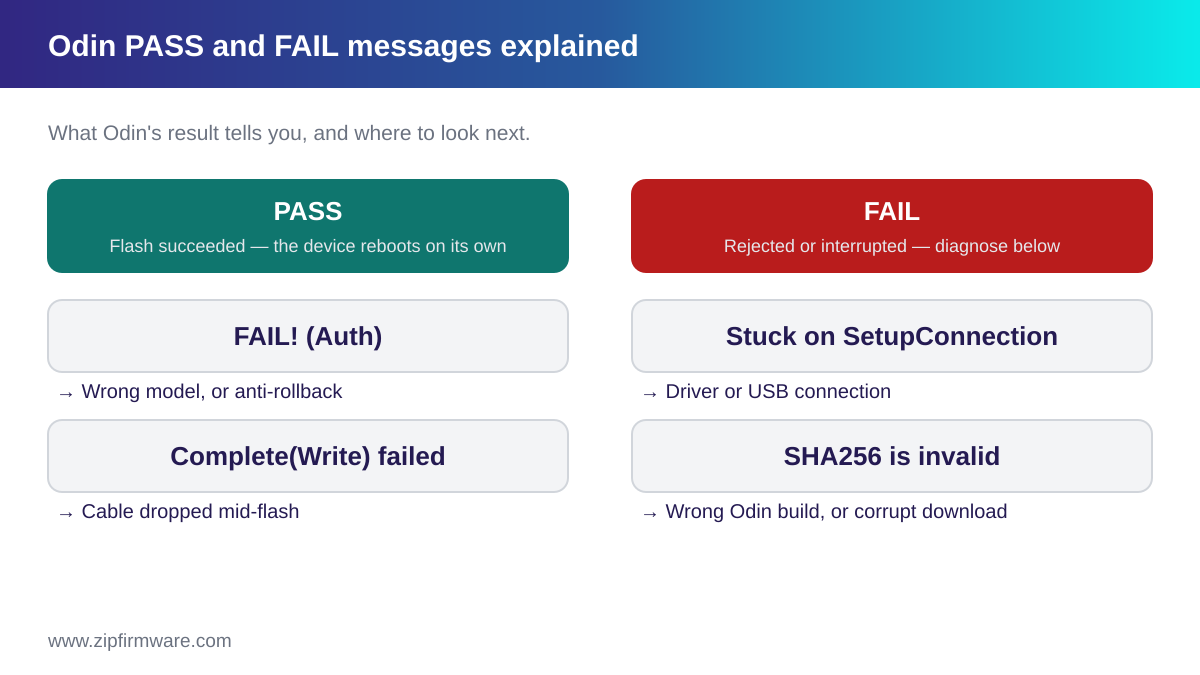
Understanding PASS vs FAIL
| Message | What it points to |
|---|---|
| PASS | The flash completed successfully |
| FAIL | The flash was rejected or interrupted |
| Stuck on SetupConnection | Driver or USB connection problem |
| SHA256 is invalid | An incomplete or corrupted firmware download, or an Odin build that cannot read it |
| Complete(Write) operation failed | The connection dropped mid-write — cable or port |
| Auth-related failure | Firmware does not match this exact model, or anti-rollback rejected it |
Exact wording varies between Odin builds, so treat the messages above as categories rather than literal strings.
HOME_CSC vs CSC: which should you use?
| CSC | HOME_CSC | |
|---|---|---|
| Effect on data | Performs a factory reset | Intended to preserve data when the installed CSC matches |
| Best for | Region or carrier switch, selling or repairing, persistent software faults | Reinstalling the same or a closely matching build |
| Predictability | Predictable — a clean slate | Conditional; back up regardless |
| Choose when | You want a genuinely clean install | You are staying on the same region and simply reflashing |
When you cannot flash Samsung firmware with Odin: device not detected
An empty ID:COM box means Windows has not enumerated the phone as a download-mode device. Work through these checks in order, cheapest first.
- Confirm the phone is actually in Download mode. The warning screen must have been accepted with Volume Up. A phone sitting at a normal boot screen will never appear.
- Change the cable. Some cables are charge-only and carry no data lines at all. Use the cable that shipped with the device if you still have it.
- Change the port. Move from a hub, monitor, keyboard passthrough or front-panel socket to a port on the back of the machine. If you have both, try a USB 2.0 port as well as USB 3.0 — swapping between them is a commonly reported workaround.
- Close Smart Switch. Samsung’s desktop software may be holding the connection. Exit it completely, including from the system tray, then reopen Odin.
- Reinstall the driver. Install the current driver package (via Smart Switch) and restart Windows so the driver stack reloads. Install the replacement before removing anything, so you are never left without a driver.
- Check Device Manager. With the phone connected in Download mode, look for a new entry appearing or disappearing as you unplug and replug. Depending on the driver version it may show under Ports, under modems, or under USB devices — what matters is that something changes when you connect.
- Run Odin as administrator. Right-click the executable and choose Run as administrator.
- Try another PC. If detection works there, the problem is more likely on the original computer than the handset — though carrying the same cable across does not rule the cable out.
Recovering from a failed flash
A FAIL result when you flash Samsung firmware with Odin looks alarming, but it does not automatically mean the device is lost. Work through this calmly rather than immediately retrying.
- Stop and read the result. The message category tells you whether to look at the firmware, the cable, or the model match.
- Check whether you can still reach Download mode. This is the single most important test. If the device still enters Download mode, you retain a route to flash again.
- Re-verify the firmware matches your exact model. A mismatch is a leading cause of rejection, and re-flashing the same wrong file will not help.
- Re-download if the archive may be incomplete. A truncated download can fail verification. Where the download source publishes a checksum, compare it.
- Change cable, port and PC before concluding the phone is at fault.
- Consider a clean flash with the full CSC. Where a data-preserving flash keeps failing, a clean install can succeed instead. This erases the device, so only do it once you accept the data loss or have a backup.
When to stop: if the device cannot reach Download mode at all, that is a service-centre case. Continuing to experiment at that point risks making a repairable device harder to repair.
PIT files and the Re-Partition option
A PIT (Partition Information Table) file describes how a device’s internal storage is divided, and Odin uses it during a flash to map images onto partitions.
Odin’s Re-Partition option, on the Options tab, rewrites that layout. It requires a PIT that matches the exact model, and a mismatch can leave the device unbootable. Note also that in some Odin builds, loading a PIT file will enable Re-Partition automatically rather than waiting for you to tick it — so avoid loading a PIT at all unless you specifically intend to re-partition.
Outside service and repair work, you are unlikely to need this. If you are not certain you need Re-Partition, you do not need it. Leave it disabled and load no PIT file.
This guide deliberately does not give step-by-step PIT instructions. Re-partitioning is a service-level operation, and where it is genuinely required the safer route is a repair professional with the correct file for your model.
What to do after the flash completes
The first boot after flashing takes noticeably longer than a normal restart. Let it run — do not force a restart because you think it has hung.
- If the device was reset, the setup wizard runs and you configure it from scratch.
- If your data was preserved, it boots to the lock screen with your apps and settings in place.
Once it is up, confirm the build number on the software information screen now matches the firmware you flashed. If it does not, do not simply re-flash — first re-check that the firmware was the correct one for your exact model variant, since a mismatch is the more likely explanation.
Insert a SIM and check signal, mobile data and a call. This exercises the modem alongside your carrier settings, so a problem here may point at either.
Finally, give the device time before judging battery life. Background work continues for a while after a fresh flash, and how long that lasts varies by model and how much data you restore.
Knox, FRP and your warranty
Two separate things that are frequently confused.
Knox
Flashing normal official firmware intended for your exact model and region does not trip the Knox warranty bit. Custom or unofficial binaries do. On current models a Knox trip should be treated as permanent, and features that depend on Knox integrity stop working afterwards — which is why matching the firmware to the device matters beyond just getting a successful flash.
FRP (Factory Reset Protection)
After a wipe, the device may ask for the Google account that was previously signed in. The legitimate route is simply to sign in with your own account.
If you are selling or passing the device on, remove your Google account from the device before wiping it, and prefer a reset performed from within the device’s own settings. Otherwise the next owner can be left facing a lock screen only your account can clear.
This guide does not cover bypassing FRP on a device you do not own.
Common mistakes
- Wrong model number — even a similar-looking carrier variant uses different firmware
- Wrong CSC or region — can fail authentication, and changes the data outcome you expected
- Low battery — the process must not lose power mid-write
- A poor or charge-only USB cable — a frequent source of unexplained failures
- Disconnecting the cable mid-flash — never touch it until the result appears
- Enabling Re-Partition — leave it off unless you know you need it
- Downloading Odin or firmware from untrusted, ad-heavy sites — a tampered build is a genuine security risk
Frequently asked questions
Is it safe to flash Samsung firmware with Odin?
It is safe when you flash the correct official firmware for your exact model. The risk comes from the wrong firmware, an unstable connection, or interrupting the process — not from the tool itself.
Will flashing remove my data?
Flashing with CSC performs a factory reset. HOME_CSC is intended to preserve your data, but only when the installed CSC matches what you are flashing. Back up either way.
Can I downgrade firmware?
Sometimes, but anti-rollback protection can reject older builds, and a failed bootloader downgrade is among the riskiest outcomes in this guide. Do not attempt it unless you are certain it is permitted for your device.
Can I flash another region’s firmware?
Often yes, where the hardware is identical — this is how region switching works. It will not work across genuinely different hardware variants of the same model. Expect a reset when the CSC changes.
Does flashing void my warranty or trip Knox?
Official firmware for your model does not trip Knox. Custom or unofficial binaries do, and that should be treated as permanent.
How long does flashing take?
Typically 5–10 minutes for the flash itself, plus download, extraction and a longer-than-usual first boot.
Changelog
July 2026
- Rewritten as a full reference guide, replacing the previous shorter version
- Added device detection troubleshooting, failed-flash recovery, PIT/Re-Partition, post-flash verification, and Knox/FRP sections
- Clarified that HOME_CSC preserves data only when the installed CSC matches — a common and costly misunderstanding
- Added the CSC decision chart, slot mapping, timeline and PASS/FAIL charts
- Refreshed guide info: Odin v3.14.4, Windows 11 (25H2/26H2), One UI 7–9 coverage
Final thoughts
Once you flash Samsung firmware with Odin a couple of times it becomes predictable, provided the fundamentals are right: the correct model-specific firmware, a stable USB connection, and a clear decision between CSC and HOME_CSC. Almost every failure traces back to a handful of causes, and the tables above cover them.
Before you flash, it is worth reading:
- Samsung CSC codes explained: what they are and why they matter
- Samsung firmware files explained: AP, BL, CP and CSC
- How to check your Samsung Galaxy’s firmware version
- Stock ROM vs custom ROM: which is right for your Galaxy?
- How to fix a Samsung Galaxy stuck on the boot logo
Browse the full ZipFirmware archive to find the exact firmware for your device.
ZipFirmware
We maintain the ZipFirmware archive of official Samsung stock ROMs. Every guide here is written from the same files you download.